

iTandCoffee has been very busily re-recording the video tutorials from the 'Getting to Know your Mac' class series. These tutorials cover all the topics that are presented in the regular class series that we run at iTandCoffee - PLUS many extra topics that we don't get time to cover during those face-to-face classes.
We are very proud of this new set of videos, which offer a great way to learn about your Mac. A popular tip from the Getting to Know Your Mac class series A particular topic from the Files, Folders and Finder class in this series always gets a lot of appreciative comments from those present. It covers how you can easily 'preview' files in Finder without having to open the file. Here is the topic tutorial from that class, available for anyone to view:
We are about 70% through recording of the Getting to Know Your Mac video tutorials - you can see the full set of what is currently available here.
Here are some more sample video tutorials
If you are interested in getting a further taste of the style and content of our Mac video tutorials, here are some samples for you. From Class 1: A Guided Tour of the Mac In part 1 of the 4-class series, we go on a 'guided tour' of the Mac so that you can find your way around, and find the things you need. We look at preferences, key areas, features and options, and more - a great way to get started! From Class 2: Files, Folders and Finder In part 2 of the 4-class series, we look at managing all your files on your Mac. Get a better understanding of your Finder app, as we look at where to store your files, how to organise them, how to view, share, ad print them, and more. From Class 3: Backups, Apps and Preferences In part 3 of the 4-class series, we look at backing up your Mac to protect your data, managing and navigating application 'Windows', and an overview of some of the key apps - Safari, Mail, Contacts, Calendar.
Learn more about your Mac
As a VERY LIMITED OFFER, we are offering a DISCOUNTED PRICE for access to all Getting to Know your Mac tutorial videos (including those that will be recorded shortly). This special price will apply for only the next couple of weeks (while we finish off recording). Find out more about these videos and the special price by selecting the button below.
Join the iTandCoffee Club to gain access to ALL video
Alternatively, join the iTandCoffee Club's Online or Premium Plan to gain unlimited access to ALL iTandCoffee Club videos (both 'live' classes and recorded tutorials) - on iPad, iPhone, Mac, Evernote, Making Photo Books, Travelling with Technology, a range of 'members-only' videos and more. Join the Plus or Premium plans of The iTandCoffee Club before November 30th 2017, to go in the draw to WIN A NEW IPAD. Become a member of The iTandCoffee Club
0 Comments
I was on a website yesterday that started one of those annoying videos that automatically plays.
I really dislike the intrusion of the noise of these videos, and the waste of my internet data that goes with streaming them. While I can simply 'mute' the autoplay video - by clicking the little speaker symbol that appears in the Safari address bar (on the right) - I would rather completely stop these videos from playing automatically. In MacOS High Sierra, there will be a setting that makes it easy to turn off this 'autoplay' for each page you visit. But if you can't wait for High Sierra, there is a way to turn off 'autoplay' on earlier versions of MacOS (or OS X). Here is an article that describes how to do this. It definitely works! I have enjoyed the peace and quiet it has brought to my own web browsing! If you are a viewer of the ABC's 7:30 program, you might have seen a story on Wednesday 13/9/17, part of which was filmed at the iTandCoffee shop in Glen Iris. It featured one of our gorgeous clients, Wilma Grogan. For anyone who missed it, here is the link to the video and transcript of the story on the 7:30 website. The story was about the 10th anniversary of the iPhone, and Wilma represented the 'savvy seniors' who are getting into technology because of the iPhone. Below are some pictures taken during filming. Thanks so much to Natalie, Maria, Ann and Marijke who also joined in the fun of filming. Sorry you didn't all make the 'final cut' that went to air. And thanks especially to Wilma - you are such a star! Disappointing that there was no mention of the iTandCoffee name (or anything else about iTandCoffee), but it was a great experience despite that.   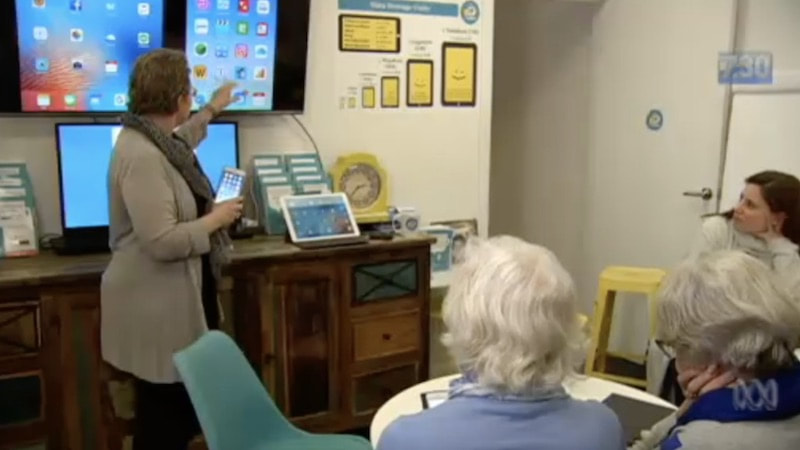   
This one nearly made me click! Have a close look at these emails (click to enlarge) and see if you can spot the differences - the things that indicate that one is a fake.
Having only recently received a real email from ASIC about the renewal of the iTandCoffee business name, I really had to look twice (and three times) at the 'same' email that I received this week. Given that I have registered two business names, my initial reaction was to believe that the email was real. Can you tell which one is real?
Working out which is legitimate
But, as I always do with any email before clicking on any links or opening/downloading any files, I had a look at who the email was from (by clicking on the email address) - and it was definitely not ASIC. The address attempted to look like an ASIC address - [email protected] - so could easily catch out many people. Another giveaway was that there was no mention of my name, or business name in the email - it seemed very generic. 
I also used the 'Quick Look' feature in my Mac Mail to preview the web page associated with the 'Pay now' link. (Hover to the right of the link and click the 'down-arrow'. You can also just hover the mouse over the link to see what website it links to. On the iPad or iPhone, hold your finger on the link to see a screen that shows the link's website address at the top.)

And boy, did the preview look authentic. But the giveaway was that the website shown at the top (see the red arrow above) was NOT ASIC.
What would have happened if I 'clicked'? In fact, the 'Pay now' link did actually 'redirect' to the real ASIC website (after first taking me to the eoaclk.com website). Obviously the scammers want you be believe they are ASIC, so that you will click the 'renewal notice' link a bit further down. Clicking the 'renewal notice' link would have downloaded malware, a virus, or even ransomware - so I dared not click it on my Mac to find out which! (I could see on my iPhone that this link would have downloaded a ZIP file to the computer - I'm sure containing all sorts of 'nasties'.) Here is the article on the ASIC website, describing this scam. Be alert to scam emails like this. Always be sure the sender is legitimate before clicking any link or downloading/opening any file in an email. Do you need further help? We have a free video that demonstrates how to detect a fake email - here is the link: If you need further help in assessing whether an email is real or a fake, you can forward the email to iTandCoffee (at [email protected]) and we will check it for you to let you know if it is safe. If you are looking to learn more about your Mac, why not attend our great class series, called 'Getting to know your Mac' - check out the dates below. Get more great tips like this!
Provide your email address here, to receive a FREE 32-PAGE eBOOK of great tips.
We'll also put you on the list to receive our FREE fortnightly newsletter, which is full of tips, news and information about using your technology in your everyday life!
Become a member of The iTandCoffee Club
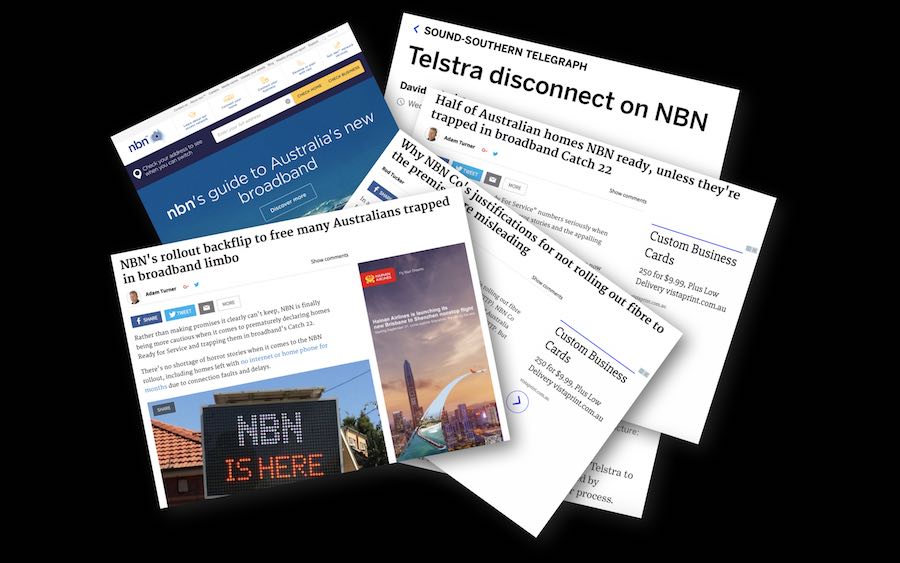 If you are a regular reader of this iTandCoffee blog/newsletter, you will know that we finally had our NBN connection completed at the start of August - nearly 6 months after it was first supposed to be connected. I must say that we have remained very impressed with the speed that we get from our new NBN HFC connection - download speeds of around 100Mbps and upload speeds of up to 40Mbps. A huge improvement on our ADSL line. Did we speak too soon? But this week saw the iTandCoffee shop without internet for 1½ days. On the first day, visiting the Telstra Service Status webpage showed that there was an 'outage' in our area. Thank goodness for my Personal Hotspot! As frustrating as that is, there is not much anyone can do in that situation - other than regularly checking to see when the service is back online, and using your mobile phone's 'personal hotspot' temporarily to provide internet connectivity. (Here's a past article on this: Lend your mobile internet to your Wi-Fi only device - using your Personal Hotspot) Even the backup 'dongle' failed! In saying this, as a business customer, we had a mobile backup device attached to our Telstra modem - one that was supposed to 'cut in' whenever the NBN service was not working. Unfortunately, this mobile device failed to work. It turned out that this was because the technician who visited in August had installed the wrong SIM card in that mobile device. Diagnosing and fixing this problem involved over 2 hours on the phone with Telstra on the first day of our outage. While this mobile backup 'dongle' could provide internet to a couple of attached devices in our building, it could not handle the number of Wi-Fi devices we needed to connect so was not really workable. So we resorted to hotspotting. Day 2 Woes On the next day, however, the Telstra Service Status showed there was no outage in our area. This meant that, supposedly, we should have internet again. Given that we had a class that morning, we very pleased to see this! Unfortunately, we very occasionally had internet - very, very slow - but it kept cutting in and out. It was not usable. We figured the problem must be at our end, so went through all the requisite steps of restarting our various devices and then checking our connection again. Still no good. Yet another call to Telstra A call to Telstra just before the class (after a 15 minute wait on hold) confirmed there was no Telstra outage. Further pressing about our issue revealed that there was, however, an NBN upgrade underway for our area - and that this would most like be the cause of our problems. When I asked the Telstra representative why the information about the NBN upgrade (and its impact) was not showing on the Telstra Service Status web page, he said that this was because it was nothing to do with Telstra! Telstra did not have have an outage, and was not doing an upgrade. Go figure. On that merry-go-round again When I asked how long the outage was likely to be (due to the upgrade by NBN), the Telstra rep told me I would need to contact NBN. I did go to the NBN website to look for a number or a web page. On that website it said that, for any faults and outages, I had to contact my internet provider. Around and around I was being sent again, in yet another frustrating example of how NBN and Telstra 'pass the buck' to each other. More time on the phone to Telstra I called back Telstra (after a class with no internet), and waited another 15 minutes to be connected. The next representative confirmed that there was no way of contacting NBN about such an upgrade, but that NBN did provide that information to Telstra (and other retailers). Again I pressed him about why this information was not on the Telstra website, and got the same response as previously - not a Telstra upgrade or fault! He told me that he could see that this NBN upgrade would be in progress until September 13th (and we were having problems on September 7th!) So we just had to wait it out. Great news (not) for a business that is completely reliant on an internet connection. Finally! It's back! We finally got back a workable internet connection at 2pm on the second day, and have not been impacted since. I just wonder at the volume of calls to the Telstra call centre that could have been avoided by simply showing on the website the information that they had available to them. And my 4-5 hours over two days spent on the issue and on the phone to Telstra could have, once again, been used for more productive purposes! 8/9/2017 0 Comments Do your eyes (and sleep pattern) a favour and turn on this feature on your iPad and iPhoneToday we were discussing kids and technology, and the issue of teenage sleep being disrupted by technology. In particular, the discussion was around the impact of screen brightness on sleep. Melbourne psychologist Tena Davies writes about this in her blog article: Night time technology use and sleep. A key suggestion Tena makes is to be sure that all iPhones and iPads in your household use a feature called 'Night Shift' at night. The Night Shift feature changes the colour spectrum of your iPhone's/iPad's screen to a warmer, less blue 'temperature'. It is not just teenagers who benefit from using this feature. I had a client recently who told me she had found she could not read at night on her iPad because of the impact the device's light had on her sleep pattern. She would find herself waking up very shortly after falling asleep. After showing her the Night Shift feature, she was able to once again use her iPad for reading at night - it made all the difference! Once you have used the Night Shift feature at night, you will be amazed at how bright the screen looks when it is not in Night Shift mode. Setting up Night Shift on your iPad and iPhone Night Shift can be set up to turn itself on and off according to a schedule. This is done in Settings -> Display and Brightness -> Night Shift. 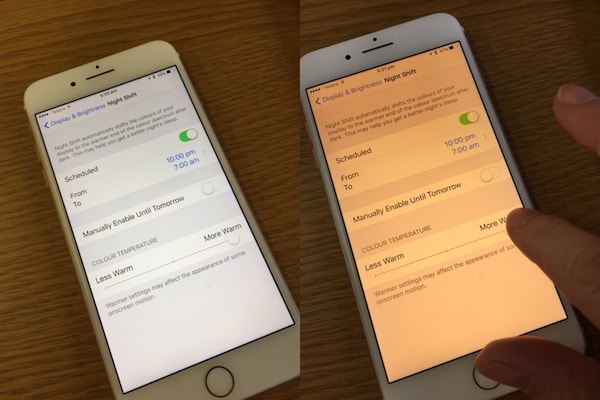 Slide the Scheduled setting to On (green), then set the from and to time that you would like Night Shift to start and end. You can also adjust the Colour Temperature slider if needed. I just leave mine at the 'maximum warmth' setting. You can see in the image above the difference in the screen lighting. Night Shift can also be manually turned on and off at any time during the day from the Control Centre (accessed by swiping up from below the bottom of the screen). 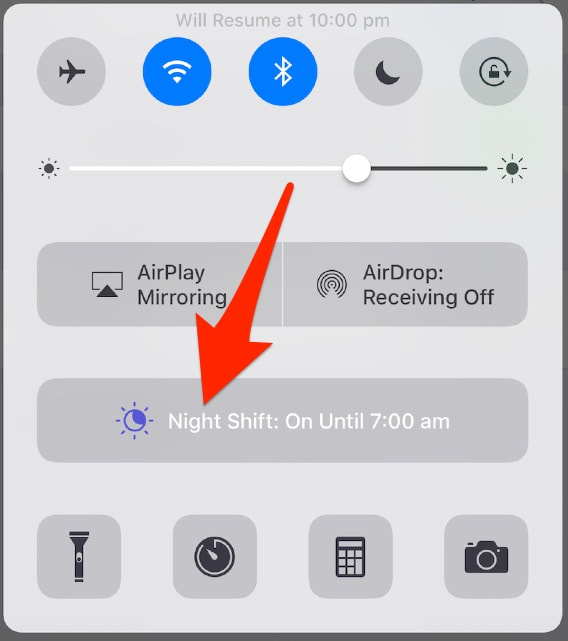  You have probably seen all the press recently about the big event that Apple has scheduled for September 12th (or 13th Aussie time). At this event, Apple will be launching the next iPhone, or series of iPhones. The rumour mill is predicting a brand new phone that will be called the iPhone 8, iPhone X, or iPhone Edition. Also predicted are updated versions of the iPhone 7 (perhaps a 7S and 7S Plus). Other rumours suggest there may be a new Apple Watch launched as well. So if you are thinking of purchasing an Apple product, it may be worth waiting to see what is announced on Wednesday - and to hopefully get cheaper pricing for the superseded devices. Operating systems are also about to be updatedAlso expected to be launched on that date (or shortly after) will be updates to all of the Apple operating systems -
Will all existing devices be able to be upgraded?Not every iPhone, iPad, iPod touch and Mac will be able to be updated to the latest version of the applicable operating system. Here is the list of compatible devices: iOS 11 will be able to run on
macOS High Sierra will be able to run on
How to find the year and model of your Mac, iPhone or iPadIf you are curious to find out the year your Mac was made, you can enter your device's serial number on this Apple page: https://selfsolve.apple.com/agreementWarrantyDynamic.do If you don't know how to work out the serial number, here is an Apple Support page that tells you where to find it: http://support.apple.com/kb/HT1349 For iPads and iPhones, here are another couple of pages that help identify the model of your device Should you install the upgrades straight away?While these new operating systems will be available for free shortly after the announcements on Sept 13, I would recommend 'holding fire' on downloading and installing these upgrades - for a few weeks at least. The first release of an operating system upgrade will often be a bit 'buggy', so it is best to let others discover those problems and wait for fixes to be released. Needless to say, iTandCoffee will download and install the upgrades as soon as they are released, and will let you know via the fortnightly newsletter when 'the coast is clear' to download and install. 
Join our next FREE FRIDAY
|

| If you are a user of macOS Sierra, you may have unintentionally turned on a new feature from Apple, one that allows you to store your Desktop and Documents folders in iCloud Drive. This does have a couple of great benefits:
|  |
However, there are also some major disadvantages this feature:
Personally, I don't want my Desktop to be syncing to my iCloud as I use it as a temporary storage area for screenshots and other files that I will not be keeping longer term. I also want to be able to be selective about what Documents content I sync to any Cloud storage solution.
iCloud Drive is nowhere near as mature a cloud storage product as Dropbox, OneDrive or Google Drive. I mainly use OneDrive for my 'cloud' storage, but also have Dropbox.
How do you get your Desktop and Documents out of iCloud Drive?
The trick is how to undo this setup once it has occurred. It is a little confusing and requires several steps.
You must go to your System Preferences -> iCloud -> iCloud Drive, and 'untick' Desktop & Documents Folders.
- You will potentially require a lot more iCloud storage to 'fit' your Desktop and Documents, involving additional monthly cost.
- You will be using more internet, due to the constant syncing that will occur with your iCloud account whenever you add or modify the files in your Documents and Desktop folders.
- You may not want all your files and folders from Documents and Desktop to be available on all devices.
Personally, I don't want my Desktop to be syncing to my iCloud as I use it as a temporary storage area for screenshots and other files that I will not be keeping longer term. I also want to be able to be selective about what Documents content I sync to any Cloud storage solution.
iCloud Drive is nowhere near as mature a cloud storage product as Dropbox, OneDrive or Google Drive. I mainly use OneDrive for my 'cloud' storage, but also have Dropbox.
How do you get your Desktop and Documents out of iCloud Drive?
The trick is how to undo this setup once it has occurred. It is a little confusing and requires several steps.
You must go to your System Preferences -> iCloud -> iCloud Drive, and 'untick' Desktop & Documents Folders.

It doesn't end there, however. There are a couple more steps to follow to get your Desktop and Documents out of iCloud and back to where they used to be.
We have recorded a video tutorial of how to get your Desktop and Documents folders out of iCloud. This tutorial is now available to all members of The iTandCoffee Club. You must have a club login to access this tutorial. (Find out how to Join the Club here »)
If you are not brave enough to undertake this change yourself, iTandCoffee can help. Appointment bookings can be made here, or just call 1300 885 420.
Would you like to understand your Mac better, and get more from it?
Learn more about Files, Folders and Finder on the Mac
We have recently re-recorded the Files Folders and Finder class from the Getting to know your Mac class series, creating a great set of easy to follow video tutorials about how to organise and manage all your files and folders on your Mac. The list of topics is shown below.
These videos are now available to anyone who has either the Online or Premium iTandCoffee Club membership. (Find out more about The iTandCoffee Club here »)
Those of you without membership can purchase this set of videos for only $25 (a great price, considering classes cost $55 - and that you can watch these videos as many times as you like!). Find out more about how to gain access to these videos here »
Try before you buy!
Would you like to first get a taste of the style of these tutorials? The first first two in the list below are unrestricted - no membership or purchase is required to view them. Check them out and see what you think.
2-1 Introduction and concepts (unrestricted)
2-2 Opening and Using Finder (unrestricted)
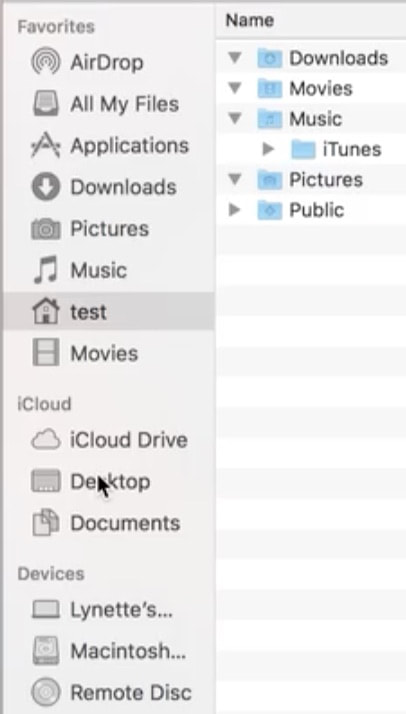
2-3 The Finder Sidebar
2-4 Main Finder Folders
2-5 Viewing your Files and Folders - List View
2-6 Viewing your Files and Folders - other Views
2-7 Arranging and Sharing Finder Content
2-8 Customising Finder's Toolbar
2-9 The Path Bar and Status Bar
2-10 Previewing Files (Quick Look)
2-11 Opening a file
2-12 Creating Folders
2-13 Reorganising your files and folders
2-14 Selecting Multiple Files
2-15 Create Folder from Selection
2-16 Reorganising using Drag and drop
2-17 Copy, Paste, Move - with Command Key
2-18 Copy, Paste, Move - with Right Click
2-19 Saving files from other applications
2-20 Get Information about a file or folder
2-21 Setting up Favourite Files and Folders
2-22 Searching for files and folders
2-23 Smart Folders, Saved Searches
2-24 Desktop and Documents in iCloud Drive
2-25 Minimising multiple app windows
2-26 Finder Keyboard Shortcuts
These videos are now available to anyone who has either the Online or Premium iTandCoffee Club membership. (Find out more about The iTandCoffee Club here »)
Those of you without membership can purchase this set of videos for only $25 (a great price, considering classes cost $55 - and that you can watch these videos as many times as you like!). Find out more about how to gain access to these videos here »
Try before you buy!
Would you like to first get a taste of the style of these tutorials? The first first two in the list below are unrestricted - no membership or purchase is required to view them. Check them out and see what you think.
2-1 Introduction and concepts (unrestricted)
2-2 Opening and Using Finder (unrestricted)
2-3 The Finder Sidebar
2-4 Main Finder Folders
2-5 Viewing your Files and Folders - List View
2-6 Viewing your Files and Folders - other Views
2-7 Arranging and Sharing Finder Content
2-8 Customising Finder's Toolbar
2-9 The Path Bar and Status Bar
2-10 Previewing Files (Quick Look)
2-11 Opening a file
2-12 Creating Folders
2-13 Reorganising your files and folders
2-14 Selecting Multiple Files
2-15 Create Folder from Selection
2-16 Reorganising using Drag and drop
2-17 Copy, Paste, Move - with Command Key
2-18 Copy, Paste, Move - with Right Click
2-19 Saving files from other applications
2-20 Get Information about a file or folder
2-21 Setting up Favourite Files and Folders
2-22 Searching for files and folders
2-23 Smart Folders, Saved Searches
2-24 Desktop and Documents in iCloud Drive
2-25 Minimising multiple app windows
2-26 Finder Keyboard Shortcuts
Are you interested in other 'Getting to Know your Mac' topics?
We have also re-recorded the first class of the Getting to know your Mac series - 'A Guided Tour of the Mac'. 13 short videos introduce you to your Mac and all the key areas and features. You can sample the first two of these videos to see what you think.
1-1 Introduction, talking terminology (unrestricted)
1-2 Starting, Stopping, Restarting, Sleeping (unrestricted)
1-3 System Preferences
1-4 The Finder
1-5 The Desktop
1-6 The Dock
1-7 Menu and Status Bars
1-8 Siri and Notification Centre
1-9 The Mac App Store
1-10 Launchpad
1-11 Mission Control and Multiple Desktops
1-12 The Dashboard
1-13 Dealing with a mis-behaving Mac or App
The rest of the class series will be available very soon, so stay tuned!
If you have any queries about these videos, don't hesitate to contact iTandCoffee on 1300 885 420 or at [email protected].
During our free iTandCoffee Club members session on Monday - where we looked at how to install and use a VPN app on your smartphone, tablet or computer - the question arose about why, when the VPN app was installed on one device (e.g. the iPad) it did not automatically appear on the other device (e.g. the iPhone).
(For anyone who is a Plus, Premium or Online club member of The iTandCoffee Club, here the link to the video of this class:
Using a VPN for safe internet while travelling or on public Wi-Fi - Free member session held 4/9/17.)
You are in control of whether your iPad or iPhone automatically downloads any app you install on the other iOS device/s.
If you would like to ensure that installed apps appear on both/all iOS devices (or want to prevent automatic installing), this is done from your Settings on each device.
Go to Settings -> iTunes and App Store
In the Automatic Downloads section, you will see different options that allow you to control which content should be automatically downloaded.
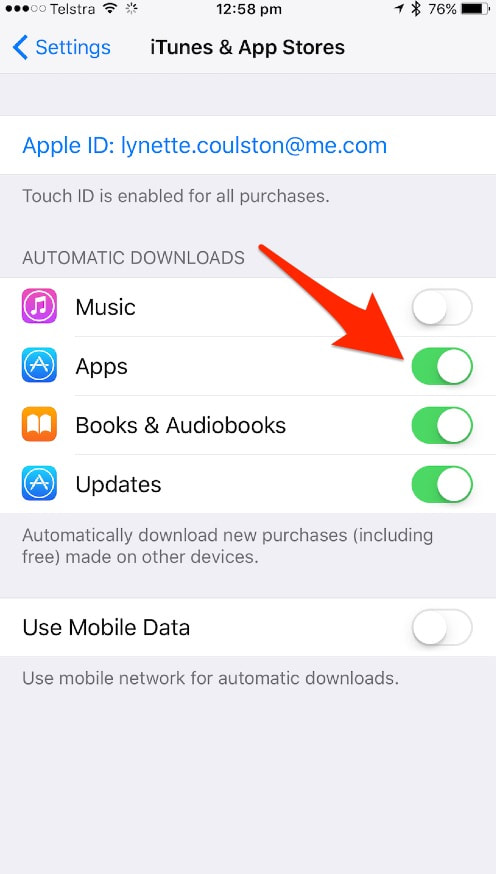
For example, you may choose to automatically download any apps installed on another i-Device, but many not want your iBooks or Music to sync.
You need to choose what Automatic Downloads apply on each of your Apple mobile devices.
You will also notice that this is where you can choose whether to use your Mobile Data for any such Automatic Downloads.
I leave this turned off, as I don't want to waste mobile data on such downloads - I only want these to occur over Wi-Fi.
Important: Mac apps are different to iOS apps
It is important to note that apps that you download and install on an iPad or iPhone (iOS Apps) DO NOT automatically sync to a Mac.
Mac apps are quite separate from iOS Apps, and need to be separately (purchased) downloaded and installed via the Mac App Store.
However, not all Apps that appear on your iPad and iPhone are available via the Mac App Store.
You will sometimes need to install the app directly from a website - as was the case with the VPN apps that were discussed during the class last iTandCoffee Club class on Monday.
For instructions about how to download and install Apps from websites, here is the video from the Getting to know your Mac series of classes.
This video (and the rest of the videos from that series) is available to any iTandCoffee Club Members with Online or Premium membership. Find out more about The iTandCoffee Club here »
It can also be purchased as part of the set of videos available from the Getting to know your Mac class series - find out more about how to get these great videos here »

Just yesterday I was working on an email that had different formatting in different places (due to some copying and pasting I was doing).
But I wanted it to have the same formatting throughout. So how could I copy the formatting from one area of text to another?
Find out how this can be easily achieved on your Mac in this hand hint for iTandCoffee Club members. (If you are not yet a member, find out more about the iTandCoffee Club here »)
If you see the login screen after clicking the above link, but do not yet have an iTandCoffee Club login, find out how you can Join The Club here for all sorts of great tips like this.
Why not come along to an iTandCoffee Class to learn about your Mac
iTandCoffee regularly runs the Getting to Know your Mac series of classes - focused on those who are new to (or relatively new to) the Mac computer, and those who want do more than just the very basics with their Mac.
Related Mac handy hints (for iTandCoffee Club members only)
Blog Articles (no membership required)
- Some keyboard shortcuts I use frequently on my Mac
- Some more great Mac Keyboard Shortcuts
- Finding those hidden symbols on your Mac keyboard
- Finding the Emoji keyboard on your Mac
Blog Articles (no membership required)
- How to type the cent symbol on your Mac
- How to type the 'Apple' symbol on your iPad or iPhone
- A new lot of Keyboard Shortcuts for your Mac
- How to copy text formatting from one area of text to another on a Mac
- Ever wonder where the Home and End buttons are on a Mac? Wonder no more…
- Finding those missing symbols on your Mac keyboard
- Have you discovered the wonderful 'Undo' function on your Mac?
- Do you have 'right-click' enabled on your Mac?
- I have just discovered my new favourite Mac keyboard shortcuts!
- How to get back those Typing Shortcuts when they disappear from your Mac
Receive great articles like this
|
Follow us on Facebook |

|
|
Join the iTandCoffee Club
Join our growing community of local and online members who love learning about their technology - through FREE club sessions, remote/phone support, online tips, tricks and tutorials, special members-only offers and discounts, and more. Membership starts at only $49/year.
|
What's on at iTandCoffee ?
Below is our list of videos, classes and other events that are coming up soon.
Videos shown are offered for eligible members of the iTandCoffee Club.
If you have questions, why not join fun and informative 'user group' meetings, held once a month.
All iTandCoffee classes are run as online classes (using Zoom), which means you can attend from anywhere.
Videos shown are offered for eligible members of the iTandCoffee Club.
If you have questions, why not join fun and informative 'user group' meetings, held once a month.
All iTandCoffee classes are run as online classes (using Zoom), which means you can attend from anywhere.
�
27 Sycamore St, Camberwell, Victoria Australia
Call +61 444 532 161 or 1300 885 320
to book an appointment or class, or to enquire about our services and products

|
SENIORS CARD WELCOME HERE:
Seniors Card holders qualify for a 10% discount on all classes booked and paid for online (excludes PTT sessions and classes already discounted during COVID-19 crisis). To activate the discount at the time of booking, select Redeem Coupon or Gift Certificate and enter 10OFFSEN before selecting Pay Now. |

© 2012-2024 iTandCoffee Pty Ltd. All rights reserved ACN: 606 340 434